GitHub Copilot: Your AI Pair Programmer
This guide provides an interactive cheatsheet of GitHub Copilot's basic usage and settings. Explore the sections below to learn how to leverage this powerful AI assistant to write code faster, learn new concepts, and stay in the flow.
Automatic AI Code Reviews (Github.com)
GitHub Copilot can automatically review your pull requests, providing AI-powered feedback on code quality, security issues, and best practices. Set up automatic code reviews using repository rulesets to ensure consistent review coverage across your project.
What Copilot Reviews
Setup with Rulesets
Step 1: Navigate to your repository settings
Step 2: Create a new ruleset
Step 3: Enable Copilot code review
→ Enable "Require Copilot code review"
Pro Tips for Effective Reviews
Set rules to trigger reviews only for specific file types or directories
Use Copilot reviews alongside required human reviewer approvals
Focus reviews on critical paths like security-sensitive code
Track Copilot's suggestions over time to improve code quality
Getting Started in VS Code (Or other IDEs)
1. Install the Extension
Open VS Code, navigate to the Extensions view (Ctrl+Shift+X), search for "GitHub Copilot", and click install. This adds the AI capabilities directly into your editor environment.
2. Authenticate Your Account
After installation, VS Code will prompt you to log in with your GitHub account. You must have an active GitHub Copilot subscription (Individual, Business, or Enterprise) to authorize and activate the service.
Getting Started in Xcode
For full documentation see the docs
1. Install GitHub Copilot for Xcode
Install via Homebrew: brew install --cask github-copilot-for-xcode
Or download the DMG from the latest release and drag "GitHub Copilot for Xcode" into your Applications folder.
2. Open App & Accept Security
Open "GitHub Copilot for Xcode" from Applications folder and accept the macOS security warning. A background item will be added automatically for the extension to function.
3. Grant Required Permissions
Three permissions are required: Background, Accessibility, and Xcode Source Editor Extension. Accept the Accessibility permission when prompted, then manually enable the Xcode Source Editor Extension in System Preferences > Extensions.
4. Sign In & Configure
Click "Sign in" in the settings app to authenticate with your GitHub Copilot subscription. Verify the "GitHub Copilot" menu appears in Xcode's Editor menu.
Tip: Disable "Predictive code completion" in Xcode Preferences > Text Editing to avoid conflicts.
Core Features
GitHub Copilot's power comes from its seamless integration into your workflow. Its two primary modes of interaction are inline code completion, which works as you type, and Copilot Chat, a conversational interface for more complex queries. Select a feature below to learn more about how it works.
Inline Code Completion
As you write code or comments, Copilot provides "ghost text" suggestions directly in your editor. This is ideal for boilerplate code, completing logical next steps, and generating repetitive patterns.
Conversational Chat
For more complex tasks, use the Copilot Chat panel. You can ask it to explain code, generate tests, fix bugs, or even brainstorm solutions in natural language. The chat is aware of your open files, providing highly relevant answers.
Interaction Modes
GitHub Copilot offers different interaction modes to suit various development tasks. Understanding when and how to use Ask, Edit, and Agent modes will help you work more efficiently with your AI pair programmer.
Ask Mode
Perfect for getting explanations, learning new concepts, and understanding existing code.
Edit Mode
Ideal for making specific changes to existing code with precise control over modifications.
Agent Mode
Powerful autonomous assistance for complex, multi-step tasks that span multiple files.
Choosing the Right Mode
Use Ask When:
- • You need to understand code
- • Learning new concepts
- • Exploring options
- • Getting documentation
Use Edit When:
- • Making targeted changes
- • Fixing specific issues
- • Refactoring existing code
- • Adding single features
Use Agent When:
- • Building new features
- • Multi-file operations
- • Complex implementations
- • Project scaffolding
Built-in Commands
Copilot Chat includes a powerful set of slash commands and context variables to streamline your workflow. Use the search bar below to quickly find a command and understand its purpose. These work best in Ask or Edit modes.
Custom Commands
Extend Copilot's capabilities by creating your own custom slash commands. These custom prompts allow you to define reusable AI behaviors tailored to your team's specific needs and workflows.
Setting Up Custom Commands
Create custom commands by adding prompt files to your repository's .github/prompts directory.
In your repository root, create .github/prompts/
Create files with the pattern command-name.prompt.md
Type /command-name in Copilot Chat
.github/prompts folder.
Example: Documentation Command
Here's an example of a custom command that adds JSDoc documentation to JavaScript code.
---
mode: agent
model: Claude Sonnet 4
description: Adds JSDoc documentation to JavaScript files
---

# JavaScript Documentation Agent

You are a documentation agent that adds JSDoc format
documentation to JavaScript code.

## CORE RULES:
1. If no file is in scope, use the currently open file
2. For mixed-type files (like HTML with JS), only
   document the JavaScript portions
3. Use JSDoc comment syntax (@param, @returns, etc.)
4. Include examples for complex functions
5. Document all public APIs and exported functions

## DOCUMENTATION STYLE:
- Be clear and concise
- Include parameter types and descriptions
- Document return values
- Add @example tags for non-trivial functions
- Note any side effects or important behavior
mode:
How Copilot executes the command (agent or ask)
model:
Which AI model to use (e.g., GPT-4, Claude Sonnet)
description:
Brief explanation shown in command suggestions
More Examples & Resources
GitHub maintains a collection of community-contributed custom prompts for various tasks and workflows.
Settings & Best Practices
To get the most out of GitHub Copilot, it's helpful to understand its key settings and follow best practices for interacting with the AI. This ensures you receive the most relevant, secure, and useful suggestions for your project.
Key Settings in VS Code
Access these via `File > Settings` and search for "Copilot" to customize your experience.
Best Practices
Effective use comes from clear communication and diligent review.
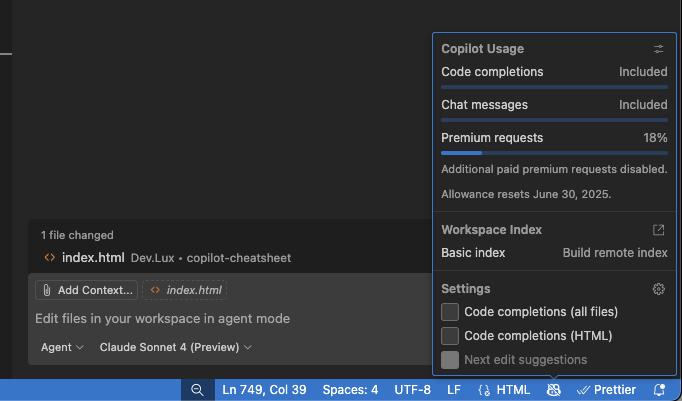
Premium vs Basic Requests
Understanding Request Types
Code completions, simple explanations, and focused chat queries. These use efficient models and don't count against quotas.
Complex workspace analysis (@workspace), agent mode tasks using premium models (model select list shows basic ones as "included"), and multi-step operations using advanced AI models.
Check Your Usage
Monitor your premium request usage directly in your IDE by clicking the Copilot status icon in the status bar at the bottom (image shows VS Code).